2021-10-12 前端达人
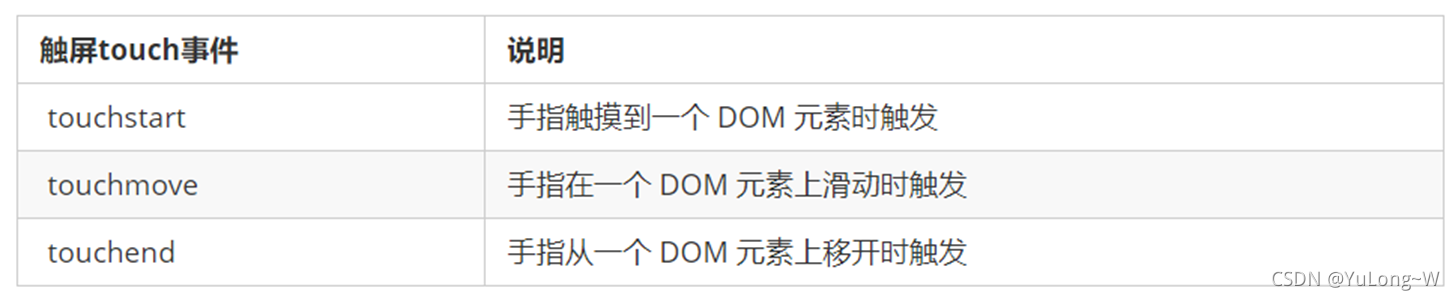
移动端浏览器兼容性较好,不需要考虑以前 JS 的兼容性问题,可以放心的使用原生 JS 书写效果,但是移动端也有自己独特的地方。比如触屏事件 touch(也称触摸事件),Android 和 IOS 都有。
touch 对象代表一个触摸点。触摸点可能是一根手指,也可能是一根触摸笔。触屏事件可响应用户手指(或触控笔)对屏幕或者触控板操作。
常见的触屏事件:
触摸事件对象(TouchEvent)
TouchEvent 是一类描述手指在触摸平面(触摸屏、触摸板等)的状态变化的事件。这类事件用于描述一个或多个触点,使开发者可以检测触点的移动,触点的增加和减少,等等
touchstart、touchmove、touchend 三个事件都会各自有事件对象。
触摸事件对象常见对象列表:
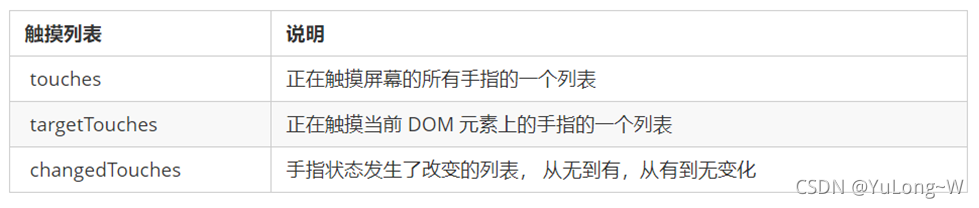
因为平时都是给元素注册触摸事件,所以重点记住 targetTocuhes
移动端拖动元素JS代码实现:
// (1) 触摸元素 touchstart: 获取手指初始坐标,同时获得盒子原来的位置 // (2) 移动手指 touchmove: 计算手指的滑动距离,并且移动盒子 // (3) 离开手指 touchend: var div = document.querySelector('div'); var startX = 0; //获取手指初始坐标 var startY = 0; var x = 0; //获得盒子原来的位置 var y = 0; div.addEventListener('touchstart', function(e) { // 获取手指初始坐标 startX = e.targetTouches[0].pageX; startY = e.targetTouches[0].pageY; x = this.offsetLeft; y = this.offsetTop; }); div.addEventListener('touchmove', function(e) { // 计算手指的移动距离: 手指移动之后的坐标减去手指初始的坐标 var moveX = e.targetTouches[0].pageX - startX; var moveY = e.targetTouches[0].pageY - startY; // 移动我们的盒子 盒子原来的位置 + 手指移动的距离 this.style.left = x + moveX + 'px'; this.style.top = y + moveY + 'px'; e.preventDefault(); // 阻止屏幕滚动的默认行为 });
classList属性是HTML5新增的一个属性。返回元素的类名,该属性用在元素中添加、移除及切换CSS类
<style> .bg { background-color: black; } </style> <body> <div class="one two"></div> <button> 开关灯</button> <script> // classList 返回元素的类名 var div = document.querySelector('div'); // console.log(div.classList[1]); // 1. 添加类名 是在后面追加类名不会覆盖以前的类名 注意前面不需要加. div.classList.add('three'); // 2. 删除类名 div.classList.remove('one'); // 3. 切换类 var btn = document.querySelector('button'); btn.addEventListener('click', function() { document.body.classList.toggle('bg'); }) </script> </body>
移动端 要求的是快速开发,所以经常会借助于一些插件来帮完成操作
JS 插件是 js 文件,它遵循一定规范编写,方便程序展示效果,拥有特定功能且方便调用。如轮播图和瀑布流插件
插件的使用:
特点: 它一般是为了解决某个问题而专门存在,其功能单一,并且比较小。比如移动端常见插件:iScroll、Swiper、SuperSlider
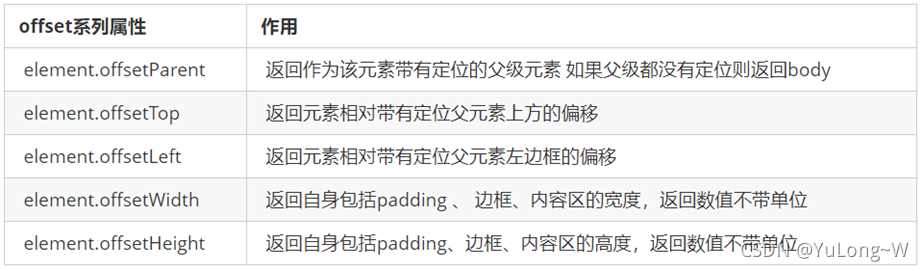
offset 翻译过来就是偏移量, 使用 offset 系列相关属性可以 动态 的得到该元素的位置(偏移)、大小等。
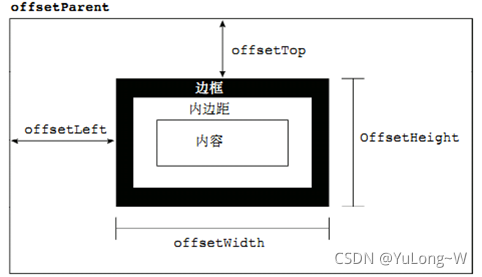
常用属性:
图示:
offset与style区别:
| offset | style |
|---|---|
| 可以得到任意样式表中的样式值 | 只能得到行内样式表中的样式值 |
| offset系列获得的数值是没有单位的 | style.width 获得的是带有单位的字符串 |
| offsetWidth 包含padding+border+width | style.width 获得不包含padding和border 的值 |
| offsetWidth 等属性是只读属性,只能获取不能赋值 | style.width 是可读写属性,可以获取也可以赋值 |
| 获取元素大小位置,用offset更合适 | 元素更改值,则需要用style改变 |
案例——获取鼠标在盒子内的坐标:
效果展示:
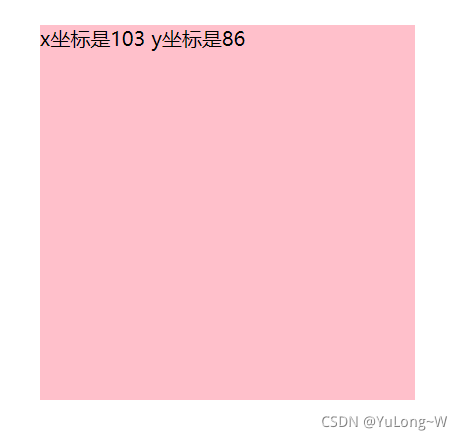
实现代码(JS):
// 在盒子内点击, 想要得到鼠标距离盒子左右的距离。 // 首先得到鼠标在页面中的坐标( e.pageX, e.pageY) // 其次得到盒子在页面中的距离(box.offsetLeft, box.offsetTop) // 用鼠标距离页面的坐标减去盒子在页面中的距离, 得到 鼠标在盒子内的坐标 var box = document.querySelector('.box'); box.addEventListener('mousemove', function(e) { // console.log(e.pageX); // console.log(e.pageY); // console.log(box.offsetLeft); var x = e.pageX - this.offsetLeft; var y = e.pageY - this.offsetTop; this.innerHTML = 'x坐标是' + x + ' y坐标是' + y; })
案例——模态拖拽框:
效果展示:
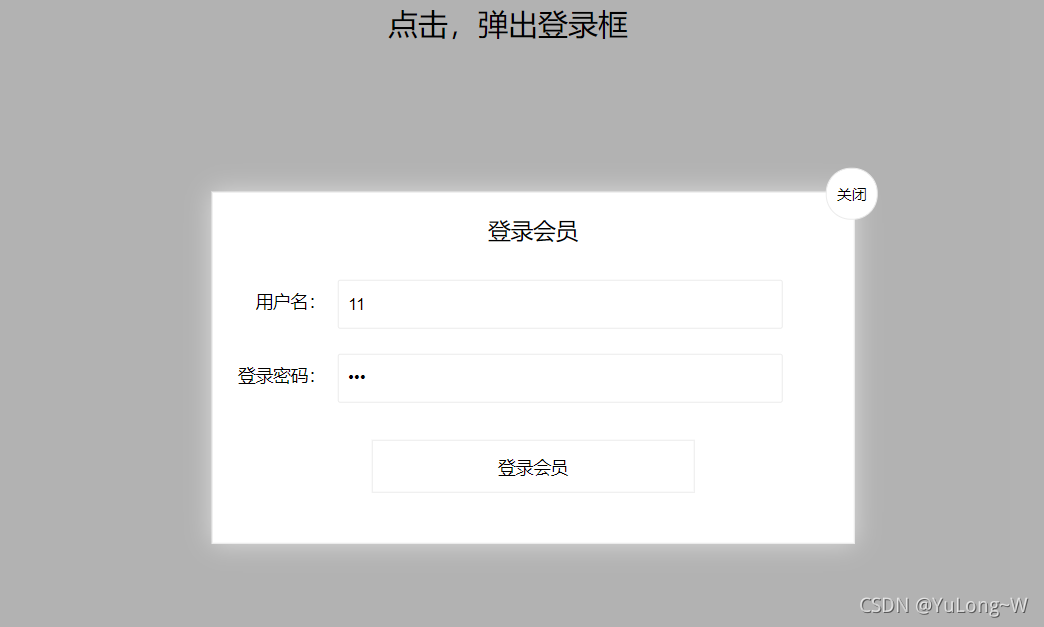
实现代码:
<head lang="en"> <meta charset="UTF-8"> <title></title> <style> .login-header { width: 100%; text-align: center; height: 30px; font-size: 24px; line-height: 30px; } ul,li,ol,dl,dt,dd,div,p,span,h1,h2,h3,h4,h5,h6,a { padding: 0px; margin: 0px; } .login { display: none; width: 512px; height: 280px; position: fixed; border: #ebebeb solid 1px; left: 50%; top: 50%; background: #ffffff; box-shadow: 0px 0px 20px #ddd; z-index: 9999; transform: translate(-50%, -50%); } .login-title { width: 100%; margin: 10px 0px 0px 0px; text-align: center; line-height: 40px; height: 40px; font-size: 18px; position: relative; cursor: move; } .login-input-content { margin-top: 20px; } .login-button { width: 50%; margin: 30px auto 0px auto; line-height: 40px; font-size: 14px; border: #ebebeb 1px solid; text-align: center; } .login-bg { display: none; width: 100%; height: 100%; position: fixed; top: 0px; left: 0px; background: rgba(0, 0, 0, .3); } a { text-decoration: none; color: #000000; } .login-button a { display: block; } .login-input input.list-input { float: left; line-height: 35px; height: 35px; width: 350px; border: #ebebeb 1px solid; text-indent: 5px; } .login-input { overflow: hidden; margin: 0px 0px 20px 0px; } .login-input label { float: left; width: 90px; padding-right: 10px; text-align: right; line-height: 35px; height: 35px; font-size: 14px; } .login-title span { position: absolute; font-size: 12px; right: -20px; top: -30px; background: #ffffff; border: #ebebeb solid 1px; width: 40px; height: 40px; border-radius: 20px; } </style> </head> <body> <div class="login-header"><a id="link" href="javascript:;">点击,弹出登录框</a></div> <div id="login" class="login"> <div id="title" class="login-title">登录会员 <span><a id="closeBtn" href="javascript:void(0);" class="close-login">关闭</a></span> </div> <div class="login-input-content"> <div class="login-input"> <label>用户名:</label> <input type="text" placeholder="请输入用户名" name="info[username]" id="username" class="list-input"> </div> <div class="login-input"> <label>登录密码:</label> <input type="password" placeholder="请输入登录密码" name="info[password]" id="password" class="list-input"> </div> </div> <div id="loginBtn" class="login-button"><a href="javascript:void(0);" id="login-button-submit">登录会员</a></div> </div> <!-- 遮盖层 --> <div id="bg" class="login-bg"></div> <script> // 1. 获取元素 var login = document.querySelector('.login'); var mask = document.querySelector('.login-bg'); var link = document.querySelector('#link'); var closeBtn = document.querySelector('#closeBtn'); var title = document.querySelector('#title'); // 2. 点击弹出层这个链接 link 让mask 和login 显示出来 link.addEventListener('click', function() { mask.style.display = 'block'; login.style.display = 'block'; }) // 3. 点击 closeBtn 就隐藏 mask 和 login closeBtn.addEventListener('click', function() { mask.style.display = 'none'; login.style.display = 'none'; }) // 4. 开始拖拽 // (1) 当我们鼠标按下, 就获得鼠标在盒子内的坐标 title.addEventListener('mousedown', function(e) { var x = e.pageX - login.offsetLeft; var y = e.pageY - login.offsetTop; // (2) 鼠标移动的时候,把鼠标在页面中的坐标,减去 鼠标在盒子内的坐标就是模态框的left和top值 document.addEventListener('mousemove', move) function move(e) { login.style.left = e.pageX - x + 'px'; login.style.top = e.pageY - y + 'px'; } // (3) 鼠标弹起,就让鼠标移动事件移除 document.addEventListener('mouseup', function() { document.removeEventListener('mousemove', move); }) }) </script> </body>
client 翻译过来就是客户端,使用 client 系列的相关属性来获取元素可视区的相关信息。通过 client 系列的相关属性可以动态的得到该元素的边框大小、元素大小等。
常用属性:
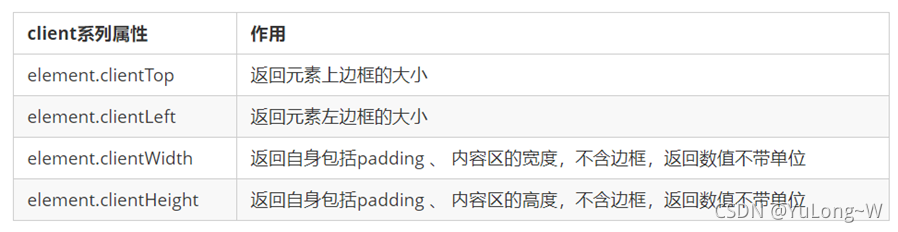
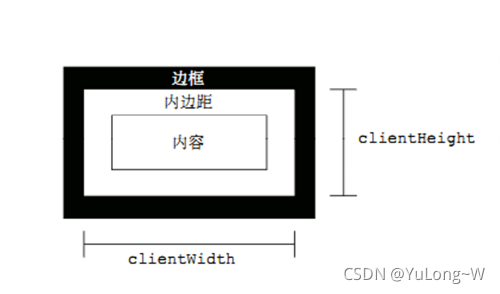
client和offset最大的区别就是 :不包含边框
图示:
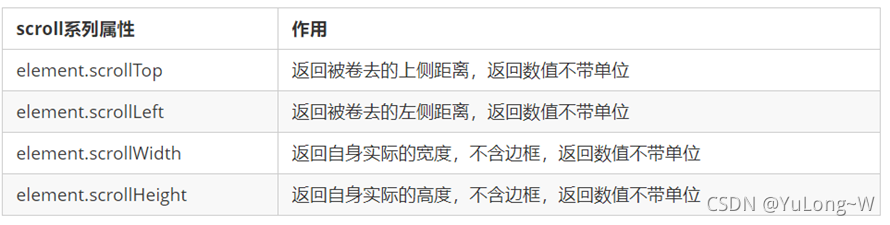
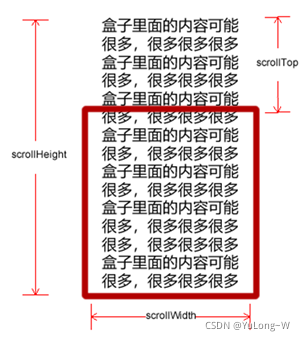
scroll 翻译过来就是滚动的,使用 scroll 系列的相关属性可以动态的得到该元素的大小、滚动距离等。
常用属性:
图示:
滚动条:
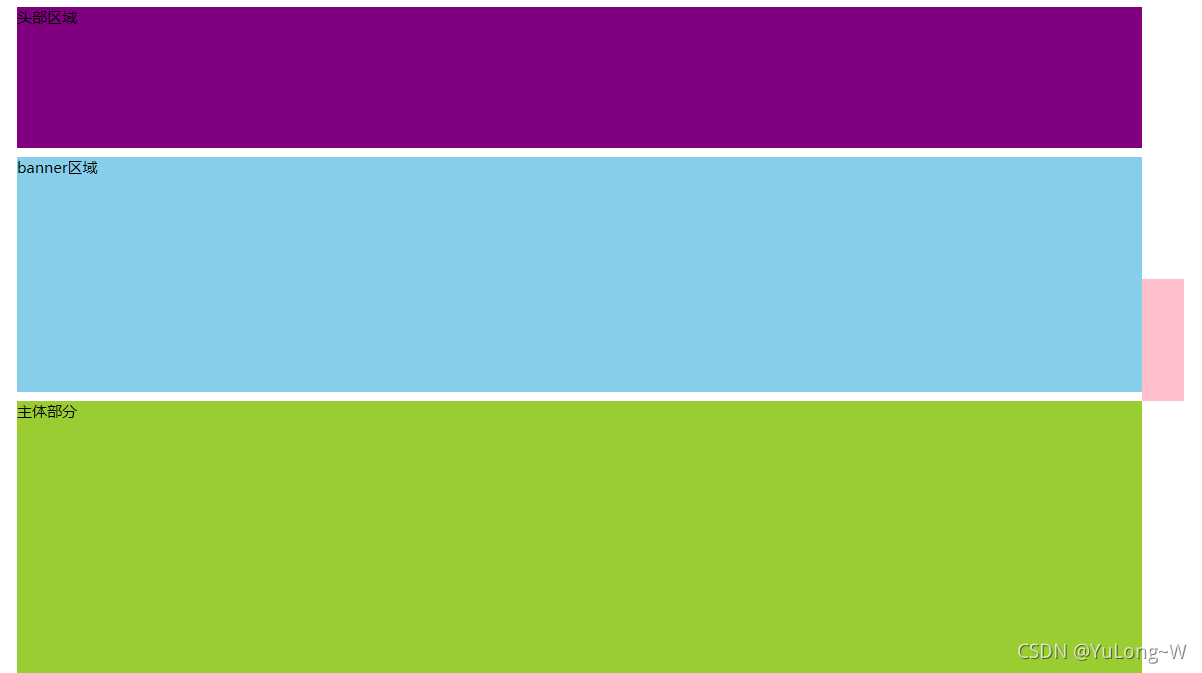
案例——固定右侧侧边栏:
效果展示:
实现代码:
<head> <meta charset="UTF-8"> <meta name="viewport" content="width=device-width, initial-scale=1.0"> <meta http-equiv="X-UA-Compatible" content="ie=edge"> <title>Document</title> <style> .slider-bar { position: absolute; left: 50%; top: 300px; margin-left: 600px; width: 45px; height: 130px; background-color: pink; } .w { width: 1200px; margin: 10px auto; } .header { height: 150px; background-color: purple; } .banner { height: 250px; background-color: skyblue; } .main { height: 1000px; background-color: yellowgreen; } span { display: none; position: absolute; bottom: 0; } </style> </head> <body> <div class="slider-bar"> <span class="goBack">返回顶部</span> </div> <div class="header w">头部区域</div> <div class="banner w">banner区域</div> <div class="main w">主体部分</div> <script> //1. 获取元素 var sliderbar = document.querySelector('.slider-bar'); var banner = document.querySelector('.banner'); // banner.offestTop 就是被卷去头部的大小 一定要写到滚动的外面 var bannerTop = banner.offsetTop // 当侧边栏固定定位之后应该变化的数值 var sliderbarTop = sliderbar.offsetTop - bannerTop; // 获取main 主体元素 var main = document.querySelector('.main'); var goBack = document.querySelector('.goBack'); var mainTop = main.offsetTop; // 2. 页面滚动事件 scroll document.addEventListener('scroll', function() { // window.pageYOffset 页面被卷去的头部 // console.log(window.pageYOffset); // 3 .当页面被卷去的头部大于等于了 172 此时 侧边栏就要改为固定定位 if (window.pageYOffset >= bannerTop) { sliderbar.style.position = 'fixed'; sliderbar.style.top = sliderbarTop + 'px'; } else { sliderbar.style.position = 'absolute'; sliderbar.style.top = '300px'; } // 4. 当我们页面滚动到main盒子,就显示 goback模块 if (window.pageYOffset >= mainTop) { goBack.style.display = 'block'; } else { goBack.style.display = 'none'; } }) </script> </body>
三大系列作用区别:

它们主要用法:
| 系列 | 作用 | 属性 |
|---|---|---|
| offset | 用于获得元素位置 | offsetLeft offsetTop |
| client | 用于获取元素大小 | clientWidth clientHeight |
| scroll | 用于获取滚动距离 | scrollTop scrollLeft |
注意:页面滚动的距离通过 window.pageXOffset 获得
核心原理:通过定时器 setInterval() 不断移动盒子位置
实现步骤:
简单动画函数封装:
// 简单动画函数封装obj目标对象 target 目标位置 function animate(obj, target) { var timer = setInterval(function() { if (obj.offsetLeft >= target) { // 停止动画 本质是停止定时器 clearInterval(timer); } //每次均匀向右移动1px obj.style.left = obj.offsetLeft + 1 + 'px'; }, 30); }
缓动效果原理:
缓动动画就是让元素运动速度有所变化,最常见的是让速度慢慢停下来
// 缓动动画函数封装obj目标对象 target 目标位置 // 思路: // 1. 让盒子每次移动的距离慢慢变小, 速度就会慢慢落下来。 // 2. 核心算法:(目标值 - 现在的位置) / 10 做为每次移动的距离 步长 // 3. 停止的条件是: 让当前盒子位置等于目标位置就停止定时器 function animate(obj, target) { // 先清除以前的定时器,只保留当前的一个定时器执行 clearInterval(obj.timer); obj.timer = setInterval(function() { // 步长值写到定时器的里面 var step = (target - obj.offsetLeft) / 10; if (obj.offsetLeft == target) { // 停止动画 本质是停止定时器 clearInterval(obj.timer); } // 把每次加1 这个步长值改为一个慢慢变小的值 步长公式:(目标值 - 现在的位置) / 10 obj.style.left = obj.offsetLeft + step + 'px'; }, 15); }
多个目标值之间移动:
当开始移动时候,判断步长是正值还是负值
动画函数封装到单独JS文件: animate.js
function animate(obj, target, callback) { // 先清除以前的定时器,只保留当前的一个定时器执行 clearInterval(obj.timer); obj.timer = setInterval(function() { // 步长值写到定时器的里面 // 把步长值改为整数 不要出现小数的问题 // var step = Math.ceil((target - obj.offsetLeft) / 10); var step = (target - obj.offsetLeft) / 10; step = step > 0 ? Math.ceil(step) : Math.floor(step); if (obj.offsetLeft == target) { // 停止动画 本质是停止定时器 clearInterval(obj.timer); // 回调函数写到定时器结束里面 // if (callback) { // // 调用函数 // callback(); // } callback && callback(); } // 把每次加1 这个步长值改为一个慢慢变小的值 步长公式:(目标值 - 现在的位置) / 10 obj.style.left = obj.offsetLeft + step + 'px'; }, 15); }
分享此文一切功德,皆悉回向给文章原作者及众读者.
转自:csdn
免责声明:蓝蓝设计尊重原作者,文章的版权归原作者。如涉及版权问题,请及时与我们取得联系,我们立即更正或删除。
蓝蓝设计( www.lanlanwork.com )是一家专注而深入的界面设计公司,为期望卓越的国内外企业提供卓越的UI界面设计、BS界面设计 、 cs界面设计 、 ipad界面设计 、 包装设计 、 图标定制 、 用户体验 、交互设计、 网站建设 、平面设计服务
蓝蓝设计的小编 http://www.lanlanwork.com